Unity中使用ScriptableObject和UI实现背包系统
ScriptableObject:
ScriptableObject 是 Unity 提供的一个数据配置存储基类,它是一个可以用来保存大量数据的数据容器,我们可以将它保存为自定义的数据资源文件。
ScriptableObject 是一个类似 MonoBehaviour 的基类,继承自 UnityEngine.Object 。要想使用它,需要我们写个脚本去继承 ScriptableObject 。需要注意的是,继承自 SctiptableObject 的脚本无法挂载到游戏物体上,毕竟它不是继承自 MonoBehaviour。
ScriptableObject 类的实例会被保存成资源文件(.asset文件),和预制体,材质球,音频文件等类似,都是一种资源文件,存放在 Assets 文件夹下,创建出来的实例也是唯一存在的
详细链接:Unity进阶:ScriptableObject使用指南
背包系统详细实现链接:背包系统制作
背包功能实现 核心代码和想法:
1
2
3
4
5
6
7
8
9
10
11
12
13
14
15
using System.Collections;using System.Collections.Generic;using UnityEngine;CreateAssetMenu(fileName ="New Item" ,menuName ="Inventory/New Item" ) ]public class Item : ScriptableObject public string itemName; public Sprite itemImage; public int itemHeld; TextArea ]public string itemInfo; public bool equip;
Inventory.cs 背包
1
2
3
4
5
6
7
8
9
10
using System.Collections;using System.Collections.Generic;using UnityEngine;CreateAssetMenu(fileName ="New Inventory" ,menuName ="Inventory/New Inventory" ) ]public class Inventory : ScriptableObject public List<Item> itemList=new List<Item>();
让我们按照事件触发的逻辑走起。
那么世界中的物体需要脚本来控制,在触发碰撞且碰撞对象为玩家(Player)时就要调用背包管理脚本添加物品,同时销毁自己。
1
2
3
4
5
6
7
8
9
10
11
12
13
14
15
16
17
18
19
20
21
22
23
24
25
26
27
28
29
30
31
32
using System.Collections;using System.Collections.Generic;using UnityEngine;public class ItemOnWorld : MonoBehaviour public Item thisItem;public Inventory playerInventory;private void OnTriggerEnter2D (Collider2D other )if (other.gameObject.CompareTag("Player" ))public void AddNewItem ()if (!playerInventory.itemList.Contains(thisItem)){for (int i=0 ;i<playerInventory.itemList.Count;i++){if (playerInventory.itemList[i]==null ){break ;else {1 ;
先修改背包的数据,然后调用RefreshItem重新生成每一个背包槽
在一开始游戏初始化的时候,我们需要预先生成一些空槽位来填充grid panel,方便之后实现拖拽功能。空槽位的大小需要我们预先在Inventory对象中定义。修改myBag的itemList大小即可。
1
2
3
4
5
6
7
8
9
10
11
12
13
14
15
16
17
18
19
20
21
22
23
24
25
26
27
28
29
30
31
32
33
34
35
36
37
38
39
40
41
42
43
44
45
46
47
48
49
50
using System.Collections;using System.Collections.Generic;using UnityEngine;using TMPro;public class InventoryManger : MonoBehaviour static InventoryManger instance;public Inventory myBag;public GameObject slotGrid;public GameObject emptySlot;public TMP_Text itemInformation;public List<GameObject> slots=new List<GameObject>();private void Awake ()if (instance != null )this );this ;private void OnEnable ()"" ;public static void UpdateItemInformation (string itemDescriptionpublic static void RefreshItem ()for (int i = 0 ; i < instance.slotGrid.transform.childCount; i++)if (instance.slotGrid.transform.childCount == 0 )break ;for (int i = 0 ; i < instance.myBag.itemList.Count; i++)
可以看到这个背包管理脚本的核心就是控制销毁或实例化slot物体。
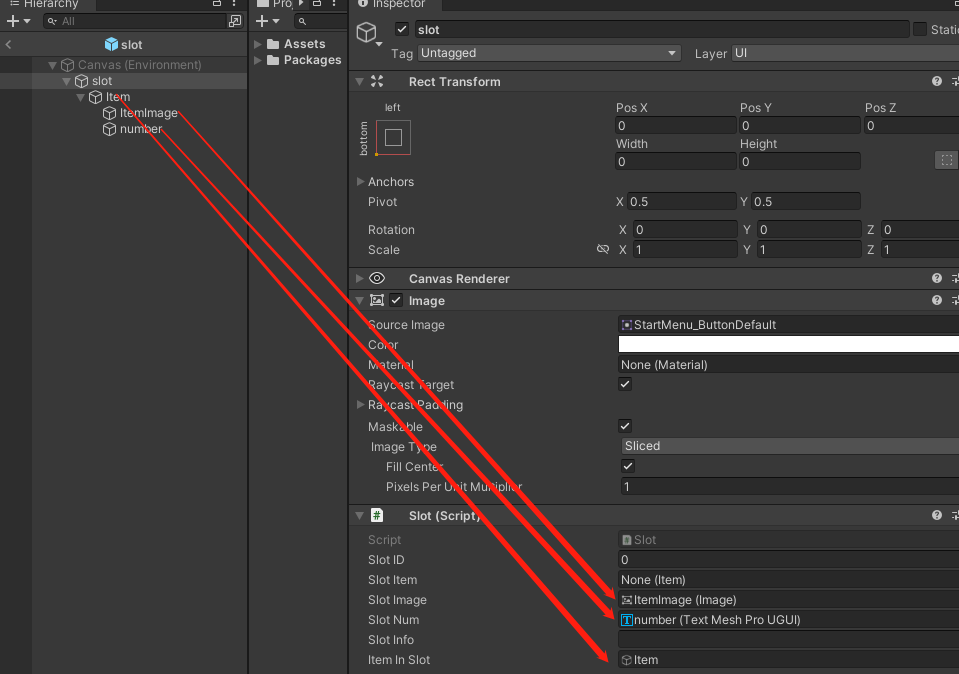
1
2
3
4
5
6
7
8
9
10
11
12
13
14
15
16
17
18
19
20
21
22
23
24
25
26
27
28
29
using System.Collections;using System.Collections.Generic;using UnityEngine;using UnityEngine.UI;using TMPro;public class Slot : MonoBehaviour public int slotID; public Item slotItem;public Image slotImage;public TMP_Text slotNum;public string slotInfo;public GameObject itemInSlot;public void ItemOnClicked ()public void SetupSlot (Item item )if (item==null ){false );return ;else {
这里的绑定关系如图所示:
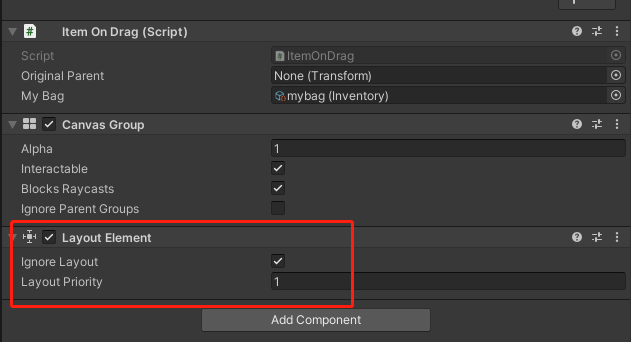
实现拖拽功能,主要靠交换slot下的item来实现,因此需要创建ItemOnDrag脚本并赋给item对象。
拖拽的时候解除item和slot的父子关系,但是此时它还是位于Gird布局下,因此会“溢出”,所以要给item添加组件,忽略布局
如何判读拖拽后的位置可以放物体进去。使用UI射线检测,为了避免item挡住检测,要给它添加CanvasGroup组件,通过设置blocksRaycasts来控制是否阻止射线检测。
如果只是交换item的位置并不能实际改变数据,下次调用RefreshItem()又会重置会原来的样子,所以需要实际交换背包的itemList对应的内容才行。1 2 3 4 5 6 7 8 9 10 11 12 13 14 15 16 17 18 19 20 21 22 23 24 25 26 27 28 29 30 31 32 33 34 35 36 37 38 39 40 41 42 43 44 45 46 47 48 49 50 51 52 53 54 55 56 57 58 59 60 using System.Collections;using System.Collections.Generic;using UnityEngine;using UnityEngine.EventSystems;public class ItemOnDrag : MonoBehaviour , IBeginDragHandler , IDragHandler , IEndDragHandler public Transform originalParent;public Inventory myBag;private int currentItemID; public void OnBeginDrag (PointerEventData eventData )false ;public void OnDrag (PointerEventData eventData )public void OnEndDrag (PointerEventData eventData )if (eventData.pointerCurrentRaycast.gameObject!=null )if (eventData.pointerCurrentRaycast.gameObject.name=="ItemImage" ){var tmp=myBag.itemList[currentItemID];true ;return ;if (eventData.pointerCurrentRaycast.gameObject.name=="slot(Clone)" )if (eventData.pointerCurrentRaycast.gameObject.GetComponent<Slot>().slotID!=currentItemID)null ;true ; return ;true ;
移动背包 最后需要做是移动背包整体界面的功能,通过在一个简单的脚本实现
1
2
3
4
5
6
7
8
9
10
11
12
13
14
15
16
17
18
19
using System.Collections;using System.Collections.Generic;using UnityEngine;using UnityEngine.EventSystems;public class MoveBag : MonoBehaviour , IDragHandler public Canvas canvas;private void Awake ()public void OnDrag (PointerEventData eventData )
保存背包数据到本地,下次加载 在场景中新建空物体,挂载GameSaveManger脚本,绑定想保存的背包
1
2
3
4
5
6
7
8
9
10
11
12
13
14
15
16
17
18
19
20
21
22
23
24
25
26
27
using System.Collections;using System.Collections.Generic;using UnityEngine;using System.IO;using System.Runtime.Serialization.Formatters.Binary;public class GameSaveManger : MonoBehaviour public Inventory myInventory;public void SaveGame ()if (!Directory.Exists(Application.persistentDataPath+"/game_SaveData" )){}"/game_SaveData" );new BinaryFormatter(); "/game_SaveData/inventory.txt" );var json=JsonUtility.ToJson(myInventory);public void LoadGame ()new BinaryFormatter();if (File.Exists(Application.persistentDataPath+"/game_SaveData/inventory.txt" )){"/game_SaveData/inventory.txt" ,FileMode.Open);string )binaryFormatter.Deserialize(file),myInventory);